Free Download Aescripts Align To Path for After Effects full version standalone offline installer for macOS. It allows you to attach and align layers to single or multiple motion paths.
Overview of Aescripts Align To Path for After Effects for macOS
Attach and align layers to single or multiple motion paths. Pretty cool! This script simplifies the process of aligning elements, text, or graphics to a path, making it easier to create dynamic and visually stunning animations. Whether you're working on a motion graphics project, kinetic typography, or any animation that follows a specific trajectory, It can save you time and enhance your creative capabilities.
How to use
- Select the layer(s) you want to attach to a motion path
- Add to your selection any masks you want to use as a motion path (IMPORTANT - Select the Mask NAME, not the Mask PATH)
Run the script.
Interface Options
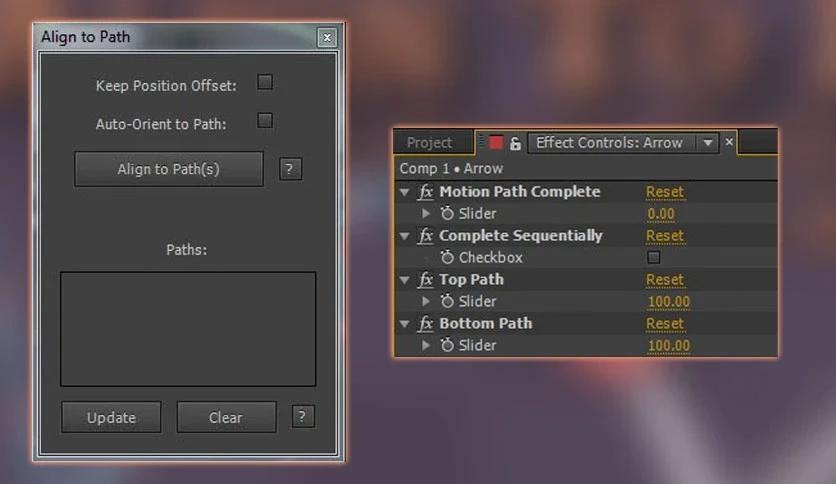
- Keep Position Offset
- Keep the layer at its current position
- Auto-Orient to Path
- Should the layer be automatically oriented while following the path
- (Note: Auto-Orient only works after an initial keyframe is created on the Motion Path Complete slider)
- Updating Paths
- Every path you add will show up in this list
To update them, do the following:
- Edit the original Mask Path (The path can not be animated)
- Select the Mask(s) you want to update in the GUI
- Click Update
- All your connected layers should jump to their new positions. Any existing keyframes will stay in place.
- Use the "Clear" button to empty the list
(This is necessary if you undo the adding of a motion path)
Control
- Motion Path Completion
- Animate through all of your paths sequentially
- When this is activated, the sliders for individual paths have no effect
- Complete Sequentially
- How far along the motion path(s) the layer is. Range 0→100
- One slider per motion path
- You can animate what % you want each motion path to contribute
- If all sliders are set to 0, then you can set a keyframe like normal on your layer
Things to keep in mind
- The sliders are only valid in the range of 0 to 100. If the slider is moved outside this range, it will be calculated as 0 or 100
(All sliders are normalized to 100% -- The values are added together and divided by the # of sliders.)
- The script makes a null per each of your motion paths. However, they are the last layers in your comp, locked, hidden, and set to shy mode.
- If the Mask Layer is rotated or scaled, motion paths will not reflect this (the same as when copying a mask in the interface)
- Even with the Orient Along Path selected, you can still animate the rotation of the layer like a normal
- When using Complete Sequentially, the masks will be completed in alphabetical order.
Technical Details and System Requirements
After Effects CS4 or later
Conclusion
It is a valuable tool for motion graphic designers and animators. Its features make it easy to align elements to paths, auto-orient them for smooth animations, and customize the motion to suit your project's needs. With time-saving capabilities and a user-friendly interface, it's a must-have script for those working with After Effects on macOS.

Leave a comment
Your email address will not be published. Required fields are marked *